
****OLD DO NOT USE HILO Admin Resource Guide
Admin Access and Management
ACCESS ADMIN PORTAL
Use the HILO Admin Portal to add or edit content in app.
- Open the HILO Admin Portal URL in a web browser. Chrome web browser is strongly recommended.
- Sign In using the Admin email address and password that was used to Sign Up to mobile or web app.
ADD OR REMOVE AN ADMIN USER OR KEY CONTACT
Admin Users may only be added or removed by the HILO Customer Success Team.
Add a New Admin User or Key Contact
- Ask the new user to Sign Up using mobile or web app using their company email address.
- Advise your HILO Customer Success team of the new user’s email address to be designated as Admin and HILO will assign Admin.
NOTE: Key Contacts are only available in select buildings to manage Access Card requests.
Remove an Admin
- Advise your HILO Customer Success team of the user’s email.
ADMIN PASSWORDS
Forgot Admin Password
- Sign In to mobile app or web app.
- Select Forgot Password and follow prompts to reset password.
Reset Admin Password
- Sign in to mobile app or web app.
- Select profile icon and then Settings.
- Select Change password and follow prompts.
VIEW A DIFFERENT BUILDING ON APP
If you are Admin on multiple buildings, you may toggle to view content in each building.
- Open mobile app or web app using a web browser. Chrome web browser is strongly recommended.
- Sign In with your Admin credentials.
- Select profile icon.
- Select Switch Building.
- Select the building to view. (It may take a few seconds to load new building).
TIP: You will only receive PUSH notifications on mobile app for the 1 building selected.
Admin Activity Centre (View Event Update Registrations)
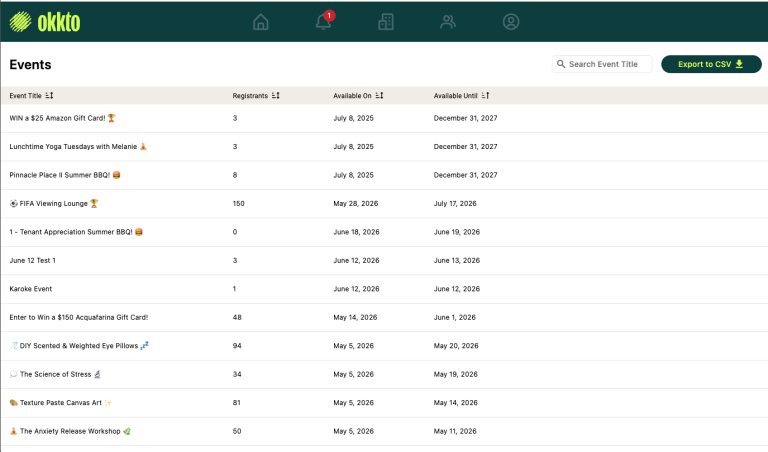
VIEW EVENT REGISTRATIONS
- Open the web version of your app in a web browser. Chrome recommended.
- Select the Profile icon from the main navigation.
- Select Tenant Requests.
- Select Events.
- Select and open the specific Event Update to view the 100 most recent registrants.
- To view ALL registrants, select the button Export to CSV to download a list of all registrations to date.
Analytics
ANALYTICS REPORTS
- Reports are updated weekly on Mondays.
- Report captures activity from previous week, ending on Sunday.
- Check latest stats on Tuesday mornings.
- Open a web browser. Chrome is recommended.
- Open and save or bookmark the URL provided by your HILO Customer Success team.
Contact Topics
REACH THE RIGHT PEOPLE
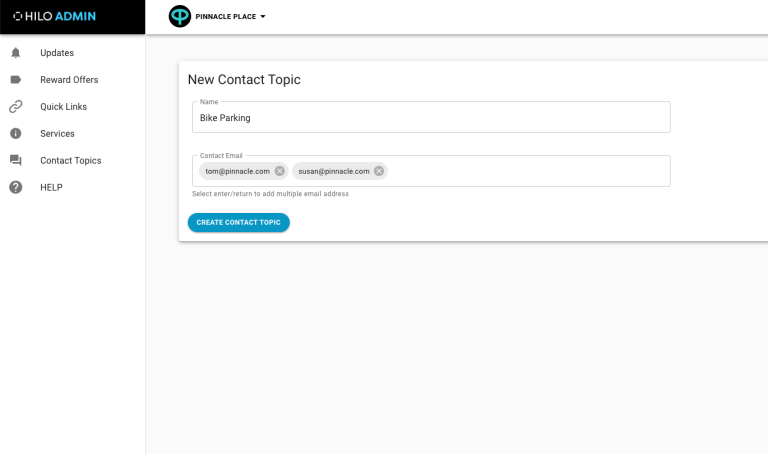
Contact Topics provides tenants with an easy way to contact a specific person about a specific topic. You can assign a team member or multiple team members to receive direct communications from tenants about a specific topic. Only email addresses can be used.CREATE A CONTACT TOPIC
- Open the HILO Admin Portal in a web browser. Chrome recommended.
- Select Building from the toggle in the top bar on left.
NOTE: If you manage multiple buildings, make sure you’re in the Building you want to create the Contact Topic from. - Select Contact Topics from left menu.
- Select Add Contact Topic button.
- Select the Name (title) of topic that will appear on the app (e.g. Bicycle Storage).
- Enter the team member’s email address and return/enter to add their email address.
- Select Create Contact Topic button.
TIP: You can add multiple email addresses if you would like more than 1 person to receive the email notifications from the tenant. Simply repeat step 6.
Content Generator & Image Library
READY TO USE CONTENT
To assist you in creating Update notifications for your building, access HILO’s ready to use image and message library organized by building topics and monthly calendar events to assist with content creation.
Various generic building services images are available and organized by topics such as events, amenities, maintenance and more. In addition, images are provided in a monthly calendar format for all Canadian Holidays. Each post idea has a sized and cropped image to download, as well as sample copy you can edit as desired.
View the Content Generator
HILO Content Generator
Okkto Content Generator
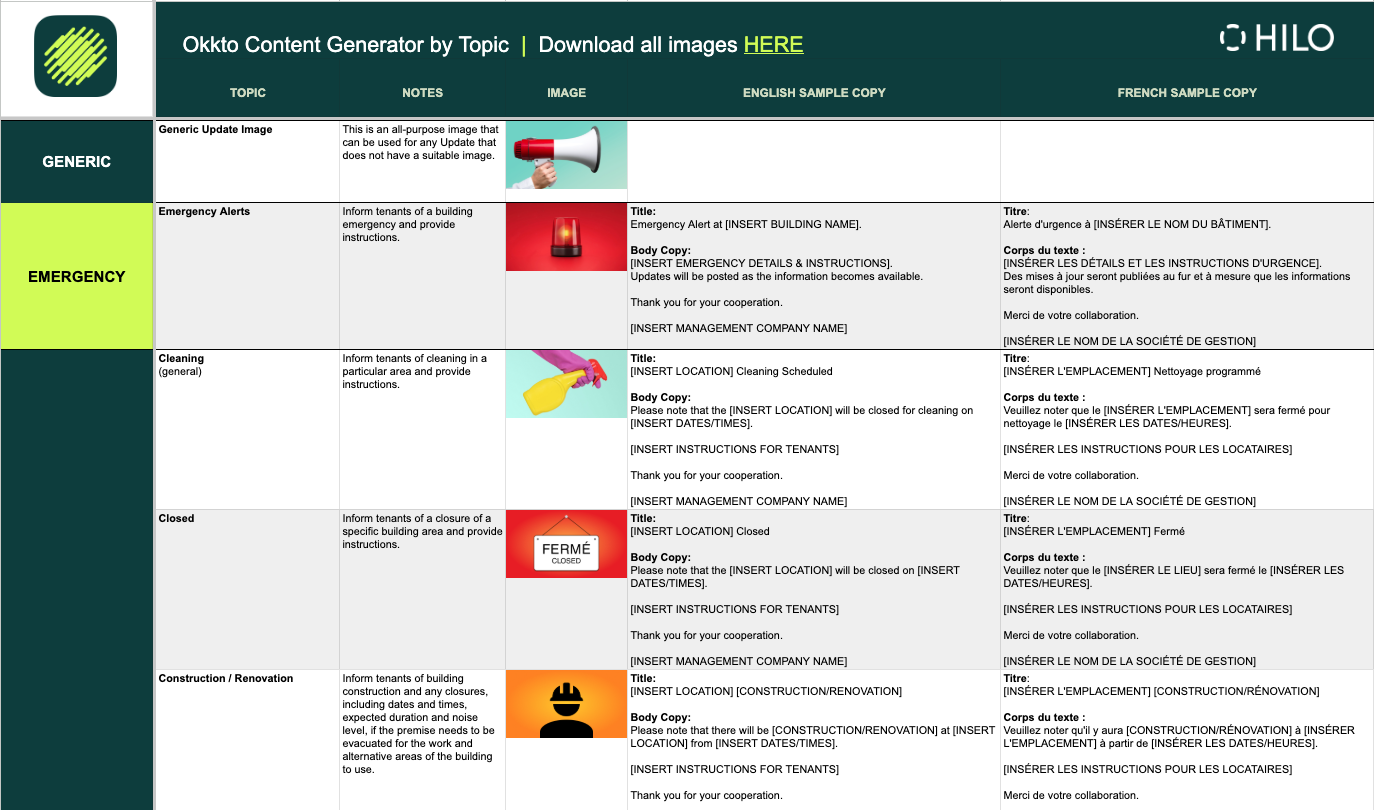
Image and Content Specifications
SPECIFICATIONS
Detailed specifications for preparing content including: image specs, text character count limits and examples of how content uploaded in the Admin Portal appears on the app.
Quick Links
FIND CONTENT FASTER
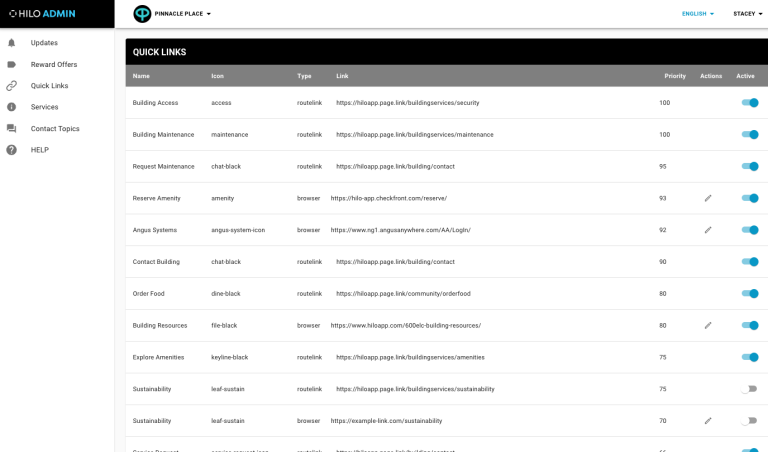
Quick Links provide an easy way for tenants to access frequently used content in the app. There is a set of Quick Links in the HILO Admin Portal for you to choose from based on your building’s requirements. From the HILO Admin Portal you may turn Quick Links ON or OFF and change the order that THEY appear on the app.
There are 2 type of Quick Links:
- Browser type links to an external URL which you enter.
- Routelink type links to an internal page in the app and this location can not be changed in HILO Admin Portal.
SET DISPLAY ORDER FOR QUICK LINKS
- Open the HILO Admin Portal in a web browser. Chrome recommended.
- Select Building from the toggle in the top bar on left.
NOTE: If you manage multiple buildings, make sure you’re in the Building you want to edit the Quick Link from. - Select Quick Links from left menu.
- For Browser Type: Select the edit pencil icon under Actions and change the number under Priority to change the order. Select the checkmark icon under Actions to save. A green box will appear in bottom right Quick Link updated!
For Routelink Type: Change the toggle to grey (Off) and change the number under Priority. Change the toggle back to blue (On). A green box will appear in bottom right Quick Link updated!
NOTE: The highest priority number will appear in the far left position on app and lowest on the far right, others will appear in between depending on the number.
TURN QUICK LINKS ON OR OFF
- Open the HILO Admin Portal in a web browser. Chrome recommended.
- Select Building from the toggle in the top bar on left.
NOTE: If you manage multiple buildings, make sure you’re in the Building you want to edit the Quick Link from. - Select Quick Links from left menu.
- TURN OFF: Change the toggle to grey (Off).
TURN ON: Change the toggle to blue (On).
TIP: If you are not using a Quick Link we recommend setting the number to zero.
ADD URL TO BROWSER QUICK LINK
- Open the HILO Admin Portal in a web browser. Chrome recommended.
- Select Building from the toggle in the top bar on left.
NOTE: If you manage multiple buildings, make sure you’re in the Building you want to edit the Quick Link from. - Select Quick Links from left menu.
- Select the edit pencil icon under Actions and add or change the URL. You must enter the full URL starting with https.
- Select the checkmark icon under Actions to save. A green box will appear in bottom right ‘Quick Link updated!
Reward Offers
REWARD TYPES
You may create different types of Rewards depending on what you are offering including $ OFF, % OFF, BOGO or Event.
All Rewards automatically generate a PUSH notification.
CREATE EVENT REWARDS WITH REGISTRATION (linked to an existing Event Update)
Who will see this Reward: Event Rewards are ONLY published to users that registered (e.g. signed up or RSVP) to a published Event Update.
Before you create an Event Reward, ensure that you have already created an Event Update that will connect to the Reward you’re creating. (see Updates: Events for details on how to create).
- Open the HILO Admin Portal in a web browser. Chrome recommended.
- Select Building from the toggle in the top bar on left.
NOTE: If you manage multiple buildings, make sure you’re in the Building you want to create the Reward from. - Important note for multiple buildings: If you use one building QR code for multiple buildings, ALWAYS ensure that you select that building first BEFORE creating a new Reward. If you create a Reward from a different building the QR code will not work.
- Select Reward Offers from left menu.
- Select Create an Offer button.
- Enter offer name (does not display on app, for your internal reference only).
- Select Type as Event.
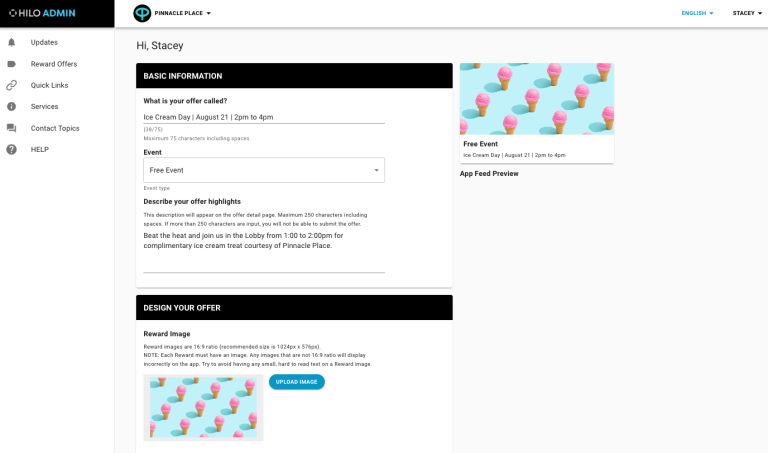
- Select Title (‘What is your offer called?’).
- Select Event Free or Paid.
- Enter details for the event (Body Copy, Image).
- Select Select ‘Available On’ and ‘Available Until’ dates.
- Select Target ‘who can see your offer’ using the Event Update title.
NOTE: You MUST select Target as the Event Update name. DO NOT select My Neighborhood or My Building. - Enter a Quantity.
- Add Terms and Conditions.
- Select Submit button.
TIPS: Publish the Reward a couple of hours before your event starts so users receive a Push notification as a reminder. Any user that registers for the Event Update after the Push will still see the Reward in the app but not receive a Push.
CREATE REWARDS WITH NO REGISTRATION REQUIRED (% Off, $ Off, BOGO or Events)
Who will see this Reward: These Rewards are published to ALL users in the selected target.
- Open the HILO Admin Portal in a web browser. Chrome recommended.
- Select Building from the toggle in the top bar on left.
NOTE: If you manage multiple buildings, make sure you’re in the Building you want to create the Reward from. If you use one building QR code for multiple buildings, ALWAYS ensure that you select that building first BEFORE creating a new Reward. If you create a Reward from a different building, the QR code will not work. - Select Reward Offers from left menu.
- Select Create an Offer button.
- Enter offer name (does not display on app, for your internal reference only)
- Select Type of Offer
- Select Title (‘What is your offer called?)
- Enter details (Body Copy, Image)
- Select ‘Available On’ and ‘Available Until’ dates
- Select Target ‘who can see your offer’
NOTE: My Neighborhood: publishes a Reward to ALL users in all buildings. My Building: publishes a Reward to ALL users in all buildings. - Enter a Quantity
- Add Terms and Conditions
- Select Submit button
TIPS: Include where, when, why in your body copy. Avoid using text on images. Include all your text in the body copy. Recommended image sizes are noted in the HILO Admin Portal.
Services
SERVICE TYPES
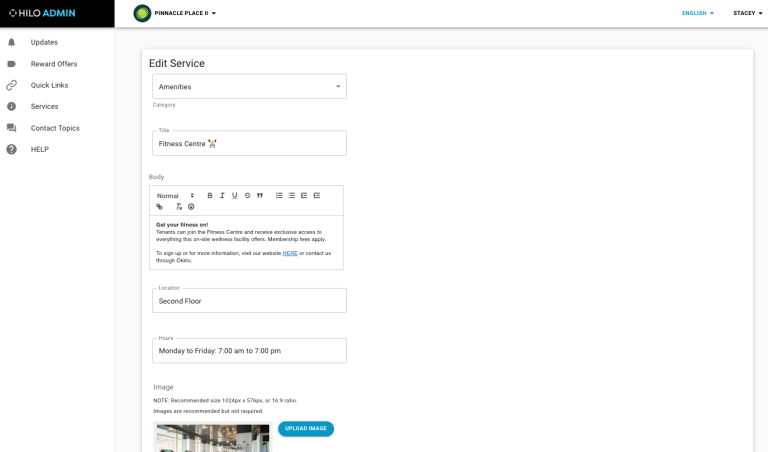
There are 6 service categories to choose from: Amenities, General, Leasing, Maintenance, Security and Sustainability.
CREATE A SERVICE
- Open the HILO Admin Portal in a web browser. Chrome recommended.
- Select Building from the toggle in the top bar on left.
NOTE: If you manage multiple buildings, make sure you’re in the Building you want to create the Service from. - Select Services from left menu.
- Select Add Service button.
- Select the Category.
- Enter details (Title, Body, Location, Hours, Image).
- Select Create Service button.
TIPS: Include where, when, why in your body copy. Add an image that represents the service. Avoid using text on your images. Include all your text in the body copy. Recommended image sizes are noted in the HILO Admin Portal.
Umbrella Reservation
NOTE: This feature only available in select buildings.
ADMIN USER
- Open the HILO Admin Portal in a web browser. Chrome recommended.
- Select Building from the toggle in the top bar on left.
NOTE: If you manage multiple buildings, make sure you’re in the Building you want to create the Service from. - Create a new Service for Umbrella Reservation details.
- Include some text for your link (e.g. Reserve an Umbrella HERE).
- Add the link URL to text (link will be provided by HILO).
TIPS: Include where, when, how in your body copy of Service and Update. Create an Update periodically to remind your tenants that you have an Umbrella service and they can reserve through the app.
MOBILE APP OR WEB USER
- Sign In to the mobile or web app.
- Open the Service or Update for Umbrella Reservation.
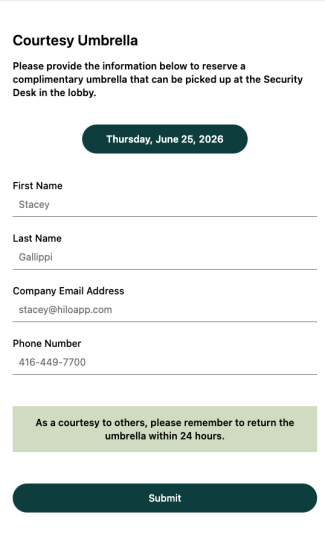
- Select the link to access the form (e.g. Reserve an Umbrella HERE).
- Enter details in form and select Submit button.
- Receive email confirmation of their reservation date.
SECURITY NOTIFICATION OF A RESERVATION
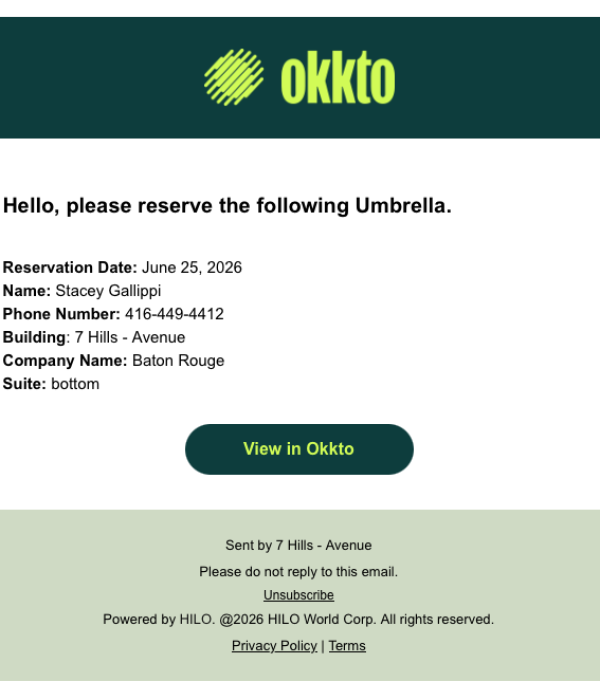
- Security receives an email notification with reservation details immediately after a tenant reserves an umbrella. The email will be from updates@yourappname.com.
- Click link in email ‘View in AppName’ to view new reservation.
NOTE: Security must be signed in to web version (yourappname.com) with Admin credentials to view.
SECURITY VIEW RECENT RESERVATIONS
- Sign In to web version (yourappname.com) with Admin credentials.
- Select Profile icon.
- Select Tenant Requests
- Select Umbrella Reservations to view recent reservations.
NOTE: the list display the 100 most recent reservations, to view all reservations, export the CSV to download all reservations to date.
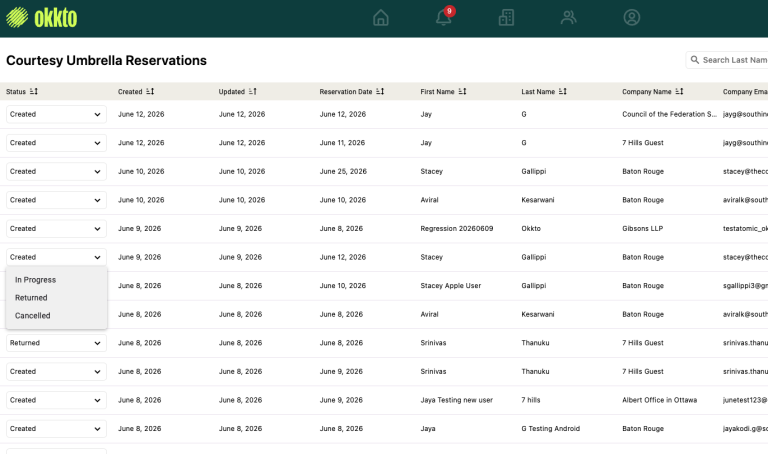
SECURITY CHANGE STATUS OF A RESERVATION
- Sign In in to web version (yourappname.com) with Admin credentials to view.
- Change Status
Created: All new requests (automatically assigned).
In Progress: Select when umbrella is provided to tenant.
Returned: Select when the Umbrella is returned.
SECURITY DOWNLOAD RESERVATIONS LIST
- Sign In in to web version (yourappname.com) with Admin credentials to view.
- Select a filter by status from top menu to download a CSV file of the filtered list, select the button Export to CSV.
- To Download all, clear the filter, select the button Export to CSV.
Updates: Notifications, Alerts, Surveys and Events
TYPES OF UPDATES
- Notifications: for general communication, announcement etc.
- Alerts: for urgent communications. Displays as a red bar at the top of the app dashboard.
- Surveys: for getting feedback from to app users. Displays as a bar at the top of the app dashboard.
- Events: for any event that requires registration, RSVP or sign up, such as seminars, workshops, contests or tenant appreciation events.
Options for Event type:
Set maximum registration number: Use when you need to limit the number of registrations for an event.
Event with Reward: Create an Event Update to register users in advance of an event AND then create an Event Reward for registered users to confirm their attendance at the event when they redeem and scan the Reward QR code at the event.
Events without Reward: to sign up/register/RSVP users in advance of an event, users do not redeem a Reward at the event.Examples:
Contests: use an Event to collect contest entries.
Giveaway: use a Notification to let users know about a giveaway event coming up and then create a Reward for the giveaway.
Out of Service: use an Alert to notify tenants immediately of an unexpected outage or service interruption.
Tenant BBQ: use an Event to collect RSVP’s and publish an Event Reward to registered users to track their attendance at the BBQ.
Tenant Survey: use a Survey to link to your survey URL with a button.
Workshop: use an Event to register users for a workshop. Use with or without the option to create an Event Reward to track attendance at the Workshop.
TIPS:
Body Copy: Include where, when, why in your body copy.
Buttons: Add a CTA with a button label and URL.
Push: Always use a Push, check the box to notify users of your new post. Your Push Notification text should communicate the importance of your post and give users a reason to open the notification to find out more. Make sure the Push notification text is slightly different from your title because it also acts as a subhead under the title in the Updates feed on the app..
Update Image: Avoid using text on your images. Include all text in the body copy.
CREATE: NOTIFICATION, ALERT OR SURVEY UPDATE
- Open the HILO Admin Portal in a web browser. Chrome recommended.
- Select Updates from left menu.
- Select Create an Update button.
- Select Type (Notification, Alert or Survey).
- Enter details for Title and Body Copy.
- Add a button (optional) with an external link. Enter text for the button label and the URL.
- Enter text for the Push Notification
- Upload image. Recommended image sizes are noted in the HILO Admin Portal.
NOTE: if no image is uploaded, a generic image will automatically publish. - Select the Push checkbox so users receive a notification on their device.
- Select Target (building(s), company or floor).
- Select ‘Available On’ and ‘Available Until’ dates.
- Select the Create Update button.
CREATE EVENT UPDATE
- Open the HILO Admin Portal in a web browser. Chrome recommended.
- Select Updates from left menu.
- Select Create an Update button.
- Select Type Event.
- Enter details for Title.
- Enter the Registration Limit if applicable. Leave blank if limit is not required.
- Enter details for Body Copy.
- Add text for the button label.
- Enter text for the Push Notification
- Upload image. Recommended image sizes are noted in the HILO Admin Portal.
NOTE: if no image is uploaded, a generic image will automatically publish. - Select the Push checkbox so users receive a notification on their device.
- Select Target (building(s), company or floor).
NOTE: Targeting Multiple Buildings with the same Event Update When creating an Event Update for multiple buildings, you MUST set the target to include ALL the buildings BEFORE selecting the ‘Create Update’ button at bottom of page. DO NOT create in 1 building and duplicate an existing Event Update for another building for same event as the system will create an entirely new separate event. - Select ‘Available On’ and ‘Available Until’ dates.
- If No Reward for this Event Update, check the checkbox. If there will be a Reward leave unchecked.
- Select the Create Update button.